This first is a challenge from the website Two Peas in a Bucket called Scrapbook Stamping / 2011 and taught by Nichol Magouirk. The specific challenge was to pull out some old stamps and incorporate them into your layout w/out using any black ink. I used Color Box chestnut roan (everyone's favorite) and prussian blue. Here's the layout:
The diecut letters are the Cricut Cuttin' Up cartridge (an oldie but a goodie!) and the diecut boot and sheriff's stars are from SVG.com. They are free SVG images that are sent out weekly in their newsletter (sign up at their website) and then I cut them out with my Cricut. You have to purchase the software in order to be able to use your Cricut for these types of images but it is very reasonably priced at around $75. There are two companies that make this software. One is Sure Cuts Alot and you can find them here. The one that I use is called Make the Cut. I understand they are both very good but I can personally vouch for Make the Cut and their terrific customer service and easy tutorials to get you started. My friend Sheri Skains is an authorized dealer for Make the Cut and at times offers discounts on the MTC software. She is currently offering it for around $60. Click on her name to access her website and the discount. Here is a closeup of the boot and badge:
Cute, huh? I backed them with a circle stamped with a subtle texture in prussian blue. Anyway, just thought I would tout this excellent software as I sure get a lot more mileage out of my Cricut this way. It has not kept me from purchasing Cricut cartridges, however. :o)
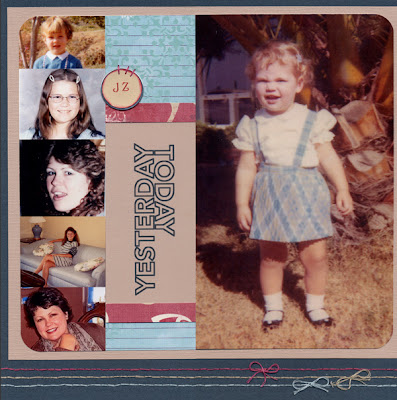
This next layout is a class that I am taking from the great Ali Edwards at Big Picture Classes. It is called Yesterday & Today and started Dec. 30 and goes until the end of March with a class posted every Thursday. I LOVE this class. The goal is to complete 12 double-spread layouts using pictures from "yesterday and today", of course. This is the title page:
What I learned in this first class:
- How to enlarge a print to 8x10 while keeping the integrity of the photo so it doesn't appear grainy or pixelated. When the enlargement spitted out of my printer, I gasped! It was weird to see a baby picture of myself so LARGE! I can see glimpses of my daughter and granddaughter in this picture. And, unfortunately, my knees still look like that. :o(
- I also learned how to shrink photos to a smaller side as on the left of the page. Shrinking is easier because you're not blowing out the pixels. The photos on the left are also in a strip. They weren't cut out individually and adhered to the page. This is cool because I can now make an entire collage of smaller pictures in Photoshop and print them all out at once. I will definitely use this technique.
- And, I learned how to change the color of a .png file to match my cardstock or pictures (the title in the case of this layout).
Rather than design, the class focuses on telling the story behind our photos from yesterday and today and includes a lot of digital tricks for working with old photos. We had to come up with 12 stories that we wanted to share with the help of appropriate photos. I really LOVE this class and if you haven't checked out Big Picture Classes, you really should. They offer many free classes/workshops and since they are all online, you can attend in your pajamas - my favorite part!


What a great layout Jeanie! And I love that you used Make the Cut! to help create it. Isn't it fun? I find myself using it almost daily now on one project or another. Thanks for the plug! Keep up the great work. :o)
ReplyDeleteSuper cute layout, Jeanie! I love it!
ReplyDeleteI'm so glad you're blogging! I'm your first follower! HOORAY!
Hugs!!